FortPro Paves the Road to Success With Vision33’s Customer Portal for SAP B1
SAP Business OneWith Vision33's Customer Portal, FortPro’s salespeople can focus on higher-value tasks like...
.png)
May 18, 2021
Blog > Enabling Real-Time Integration With Vision33 Saltbox API Gateway
Sometimes, a locked door blocks the path on your digital transformation journey. Luckily, there’s a key: APIs (application programming interfaces). APIs unlock the doors that separate your business from the outside world – your extended enterprise. They’re the connectivity interfaces that allow businesses to connect applications.
Today, we look at Vision33’s Saltbox’s API Gateway with a use case for real-time integration. By leveraging intelligent technologies like Saltbox, you can unlock the door and further integrate your business with an extended enterprise of applications.
If you think Saltbox is an integration platform as a service (iPaaS) that talks to other applications, you’re right. But the Vision33 Saltbox API Gateway is even better because other applications can talk to it and even control its behavior.
If the Saltbox user interface is an implementation consultant’s "front door" to the Saltbox application, think of API Gateway as the developer’s "alternative door."
API Gateway exposes Saltbox workflows to anywhere on the internet (with suitable security), allowing them to run in real time versus on a schedule or event trigger. Parameters or data are passed into the workflow, and workflow results, messages, or data are returned almost instantly.
The ever-increasing list of third-party systems Saltbox can connect to means this enables almost real-time interaction between any system Saltbox has a connector for or is web-service enabled.
Before APIs, integrations required custom code or applications that generated data from one system, converted it to flat-file format, then exported it to another location. At that point, because the generating system had finished its work, it “forgot” about the exported file. Then, the receiving system or code polled the file location to check for files. If files existed, it processed them into the format required for the receiving system before importing it. This "decoupled" process delays your work, as it requires several minutes to finish. While this was acceptable 20 years ago, modern-day expectations don’t accept delays.
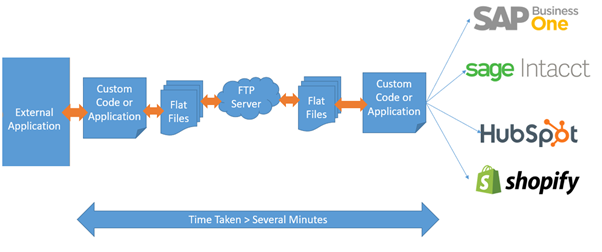
Another downside to this approach is the need for two vaults of custom code. The first vault exports the data from the origin system and formats it into the appropriate format. The second vault of custom code reads the format and turns it into data that can be imported into the receiving system. This adds several challenges for business. Usually, developers must write the code, which means the development happens a step away from the business owner and takes longer. It's also harder for the business to support long term.
Finally, since both vaults of custom code are usually written independently, they often run on schedules rather than real-time calls. If each program runs every minute, a user might do something in the originating system, then wait a minute for the export code to execute. Then it’s another minute before the receiving systems code runs. All these delays add up.
With the Vision33 Saltbox and API Gateway, the generating system makes an almost instantaneous request for Saltbox to run a workflow, passing in the data required for the workflow to run. The workflow completes its task, which may be passing data to a Saltbox connector. Once the action is complete, a response from the target system is sent back to the generating system on a typical workflow. Depending on the receiving system performance, it’s typically less than a second to complete both the request and response.
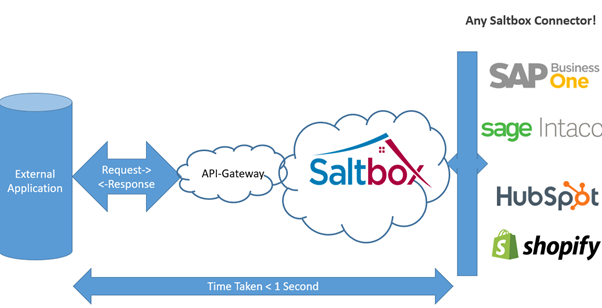
Two significant benefits of this are:
This can then shape the way you think about how integrations run. Historically, integrations were background processes that ran behind the scenes with no human interaction.
However, if your integration can happen in less than a second, you can consider running them in your application’s user interface. Imagine your ERP system contacting your eCommerce or payment provider in real-time to check if an order has been paid for before you dispatch.
First, you need a Saltbox Project with the connectors installed for the "receiving" system (i.e., the application you want to send data to).
In this example, we’re creating an external application that makes incoming payments in SAP Business One, so we need the SAP Business One service layer connector. We’ll also need the Saltbox Core connector for our trigger, as the trigger will be an API Gateway call that’s part of the core connector.
Once we have those connectors installed and the connection config for the service layer connector defined in our project settings (not required for Core connector) we can move to the next step.
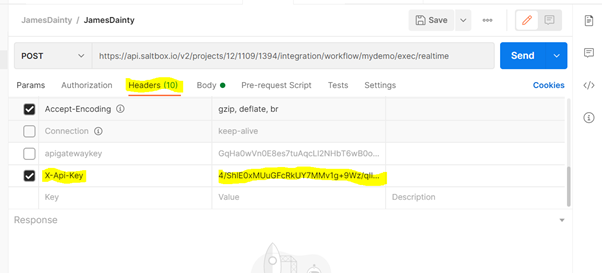
Then, we need several other settings for Saltbox to have API Gateway enabled. Go to the API Gateway settings tab in your project and enable AWS API Gateway access for the project. If this is the first time you’re doing this for a project, you’ll also need to generate at least one "API key." The API key is the authentication between the system wishing to consume the Saltbox workflows, and the system will need to pass this key as a "header" with the request.

Once you've clicked “add a key,” give the key a name and set the desired expiration date. The key will then appear in the API Keys Table.

Click the "show" option to see the full key value to be used in your application, and use the copy clipboard icon to copy it to your clipboard.
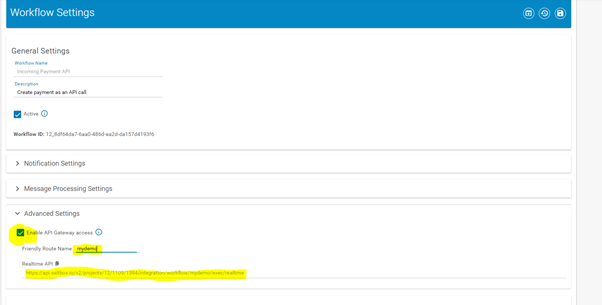
Go to your workflows’ advanced settings and enable API Gateway access for your workflow. If you want, you can give it a ‘friendly’ name. That way, the web URL needed to call the workflow will use this name rather than Saltbox's internal workflow ID.
Now we need to set up our workflow trigger and actions.
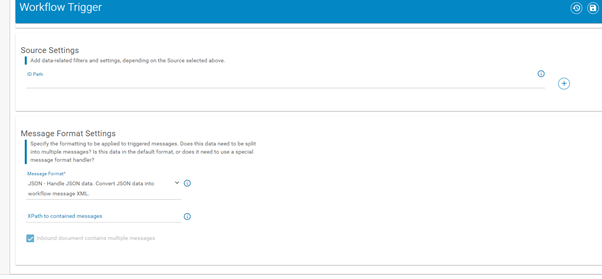
Because we want our workflow to only trigger when an external application sends requests for the workflow to run, we’ll set the trigger connector to be the Core connector. We can leave the connection config blank, as it's not talking to another system, and the source is set to the event workflow trigger (versus scheduled workflows).
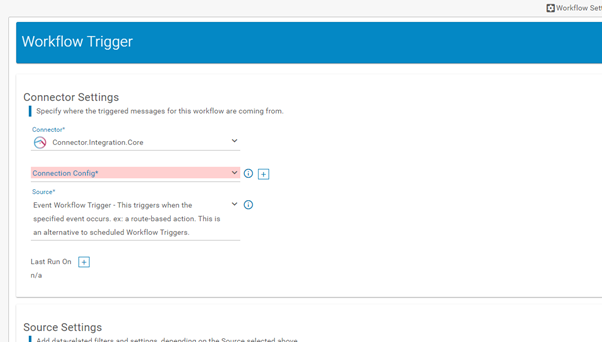
In our message settings, we define the type of data this workflow will receive from the external system. Here, we chose JSON, but it could be XML or other formats.
Now, we can go to the workflow designer and create the actions for this workflow. Here, we’re going to use the data passed from the external application to create an incoming payment in SAP Business One, then take the response from SAP Business One (whether it was successful, or, if there was an error, what the error was).
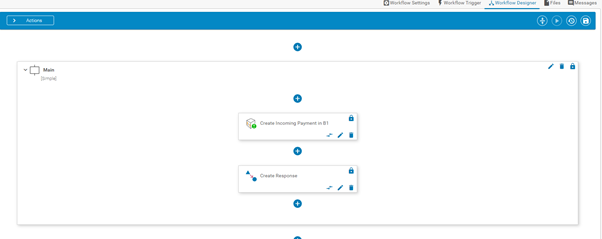
In the ‘create SAP Business One payment’ action, we have the usual create SAP Business One object create as the action type as well as that we’re going to use a map (shown next). However, because we want to send the response from SAP Business One, we’re also setting that we want to save the action output to workflow messages and give it a message name. (In this case, sapResponse.) This is because the following action will use this data as its input message to send the response back to the external application.
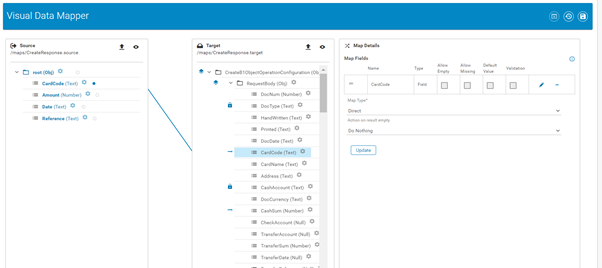
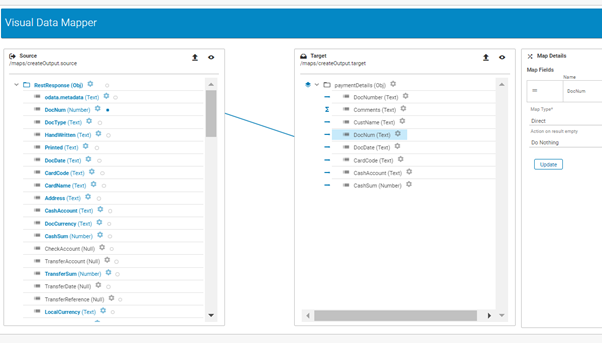
We then have a map set up for the ‘create SAP Business One payment’ action. This maps four fields, from the source data to an incoming payment in SAP Business One. The fields we’ll need to pass in when we call our workflow later are the four fields defined in the source map.
Next, our create response action is a transform action, which takes the data from our sapResponse message and applies a map to determine which data we send back to our application (i.e., the output message).
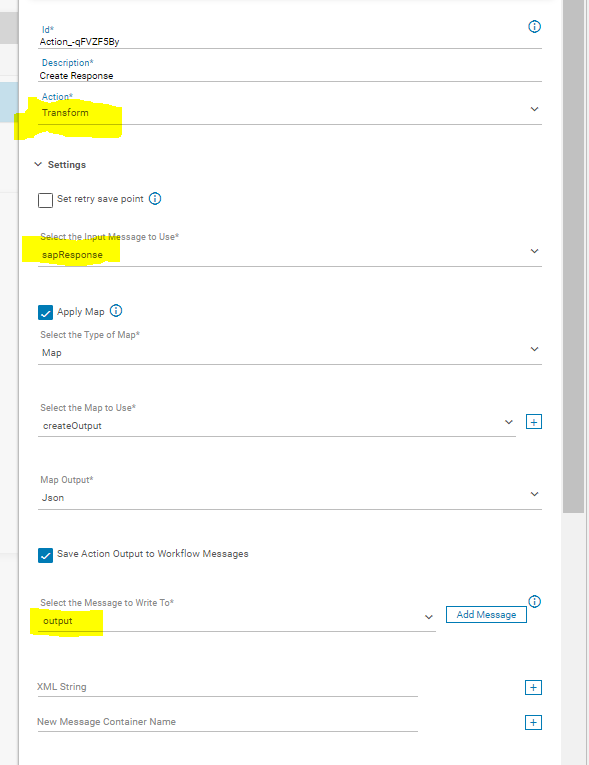
Note that the message returned to the application must always be called ‘output,’ so reserve this name in your workflows if you intend to use this.
In our response action, the map takes all the data fields returned by SAP, which by default has every field value on the object you just created, and simplifies it down to just a few fields. This reduces the amount of time required to send the data and improve performance.
That's it! We can now run our workflow from other applications.
Any system capable of making a web call and has access to the API key can run the workflow by calling the URL from our workflow settings. Here are two examples. The first uses an application called Postman, a developer's tool to make the call rather than a third-party system.
First, we define that we want to make a "POST" web call. That means we’re sending data to the API and want it to do something. Then we enter the workflow’s URL as given to us in the workflow’s advanced settings.
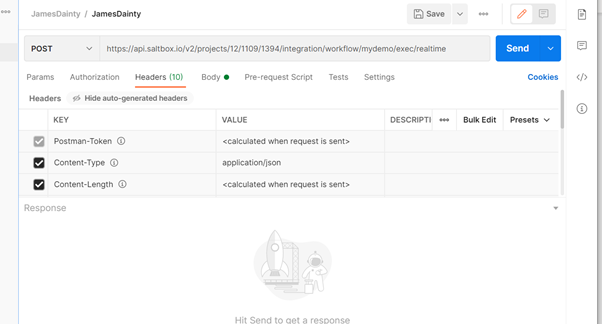
In the headers section, we create a new header and call it "X-API-Key." You must set its value to the API key you created in the API Gateway settings section.
We can then move to the body, where we’ll enter the data we wish to send with the request, based on the map we created earlier.
We can then send the request and wait for the response.
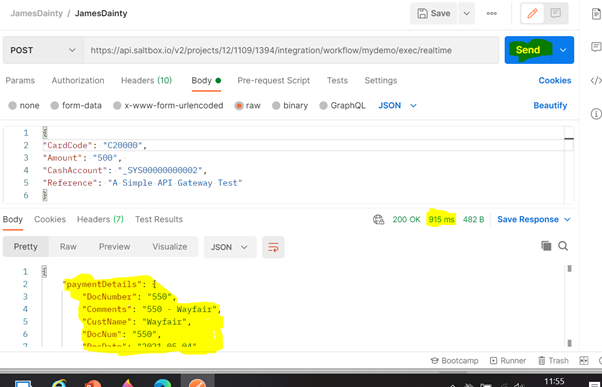
The output response is highlighted at the bottom; basically, the request created the incoming payment in SAP Business One. The cool thing about using Postman for this is that it also shows how long it took Saltbox to run the workflow and return the response – a mere 915ms.
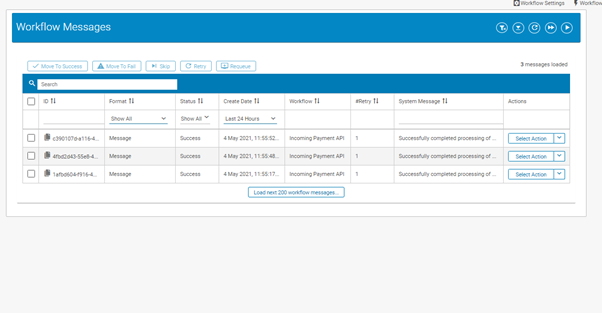
The workflow message logs will tell you when the workflow ran and the outcome; you can even use the message trace to see the data being passed in.
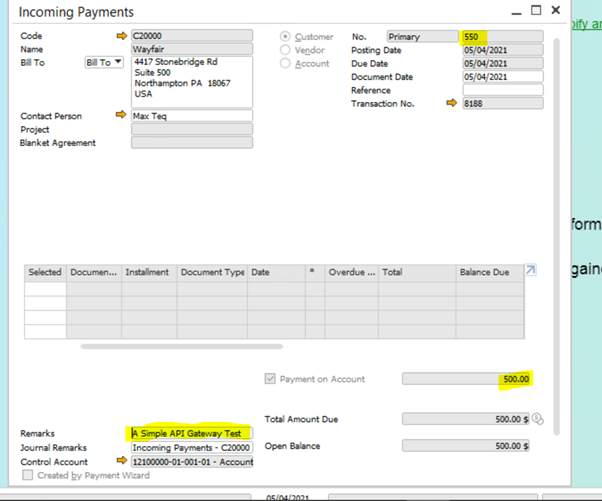
Finally, the result in the target system: an incoming SAP Business One payment.
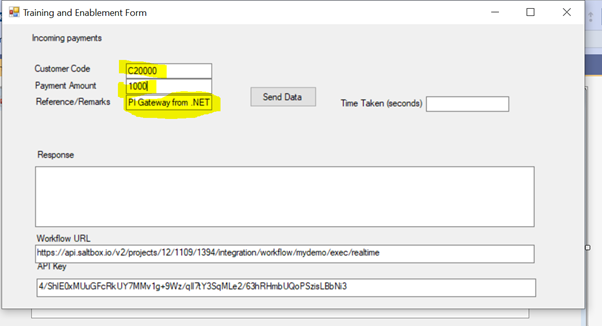
However, this is done in Postman, a developer's tool, not an application that would typically make such requests in the real world. Below, we show a basic .NET form that mimics external applications.
We enter the BP Code, the amount, and the reference for the payment we wish to create (note the URL and key at the bottom).
If we hit the ‘send data’ button, the application calls the URL and passes in the field values (formatted to JSON). When the response is received, it populates the response field with that value. It also logs the speed of the action.
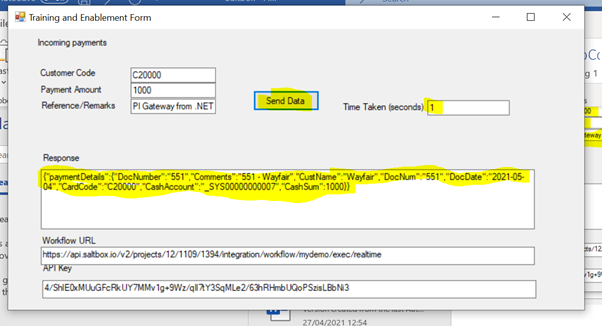
Here, you can see the DocNumber created was 551. In SAP Business One, it created the following document: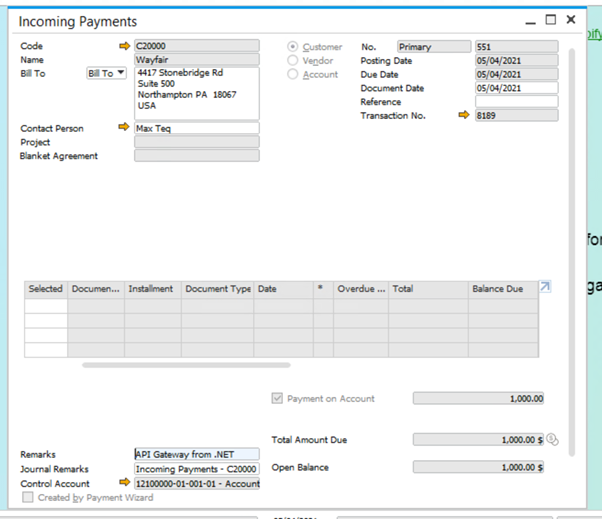
With Saltbox, real-time integration between systems takes only seconds. To learn more about what your business can do with Saltbox, watch Vision33's Saltbox demonstration today.
Subscribe to our newsletter to receive our latest blog posts, case studies and ERP news delivered straight to your inbox.
With Vision33's Customer Portal, FortPro’s salespeople can focus on higher-value tasks like...
Accounting Today recognized firms on the list, like Vision33, are on call 24/7 to help customers...
Vision33 is a multi-award-winning SAP partner whose global team of certified consultants is...
Recieve our latest blog posts, case studies, and ERP news
delivered straight to your inbox.